In two-steps container loading tasks, sometimes some pieces of cargo are required to be loaded on a designated type of pallet while others can be loaded on any kind of pallet. How do you make a container loading plan in LoadMaster load planning optimization software? Let’s explain step by step by using an exact example.
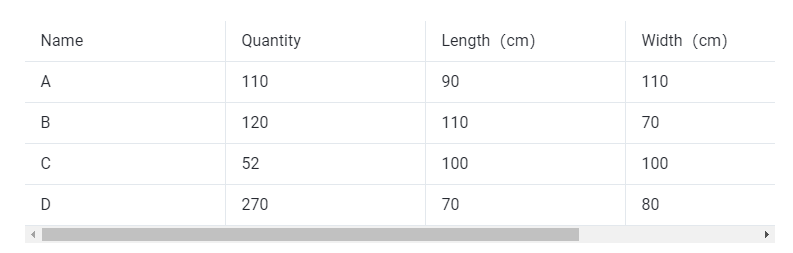
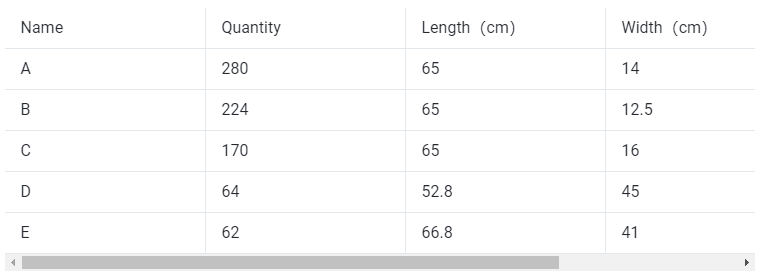
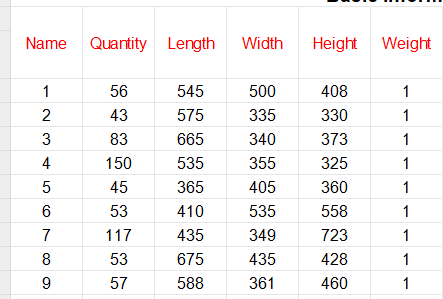
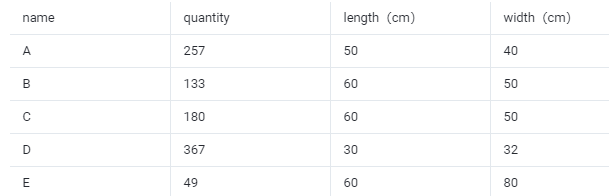
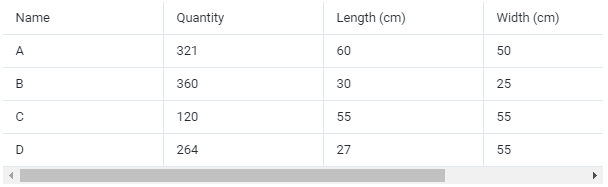
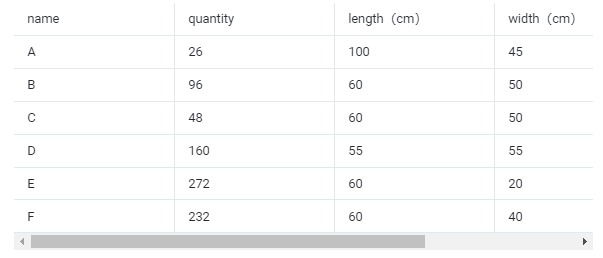
Cargo data:
Loading requirements:
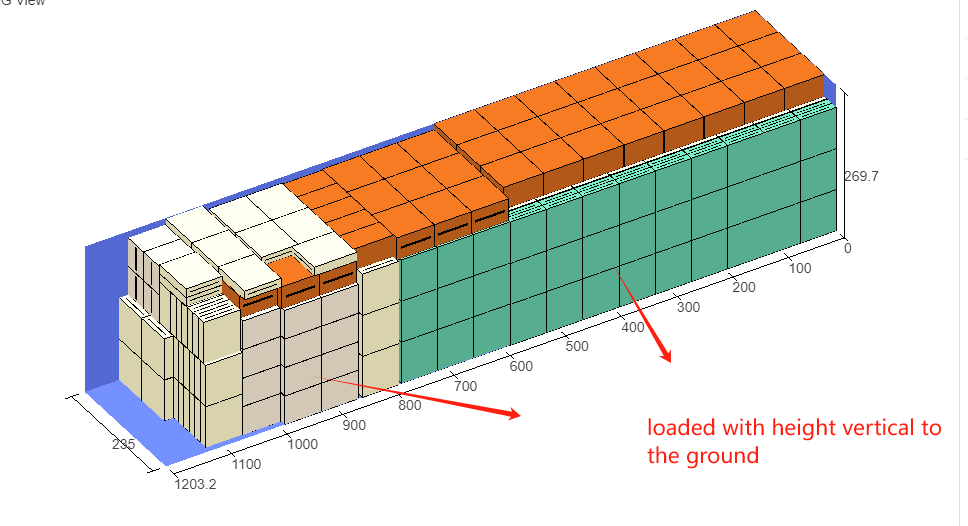
1)All goods can only be placed with the height vertical to the ground.
2)Cargo A is directly loaded into the container; cargo B and C are palletized first and then loaded into the container.
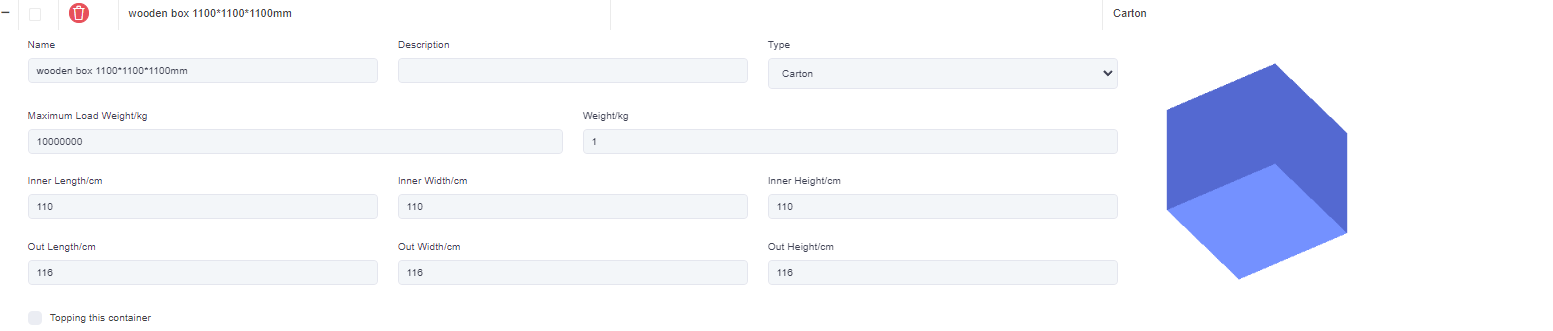
3)Cargo D is packed into a wooden box first and then loaded into the container. The inner diameter of the wooden box is 1100×1100×1100mm, and the outer diameter is 1160×1160×1160mm.
4)The cargo E and F are required to be loaded on a designated pallet and then loaded into the container. The designated pallet size is 1200×800×120mm, with a maximum height of cargo that can be loaded on this pallet of 1.2 meters (including the height of the pallet).
5)Automatically and intelligently select the most appropriate type of container and calculate how many should be used.
Specific steps:
Step 1: For there is a requirement to specify a kind of intermediate packaging, it is necessary to maintain the specified container in the database firstly.
1)After logging in LoadMaster load planning optimization software, click [Container Management] on the left to enter the container database.
2)For there are only a few types of specified pallets in this case, you can add them into the database one by one. Click [Add Container] in the upper right corner.
①First add the wooden box, edit the name of the container in the pop-up box (for example “Wooden box 1100×1100×1100”), select the type as “Box pallet”. Then fill in the inner and outer diameter of the wooden box, and finally Click [Save].
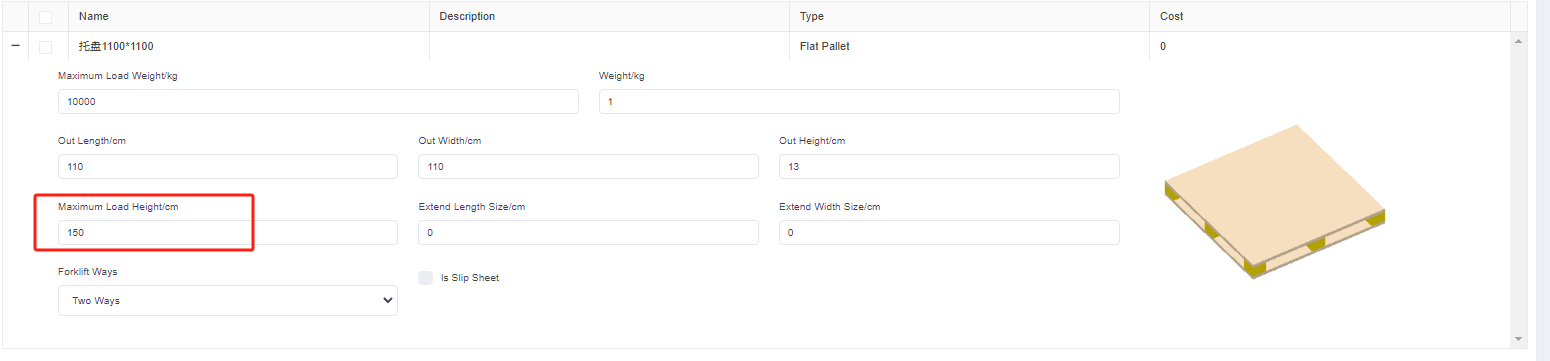
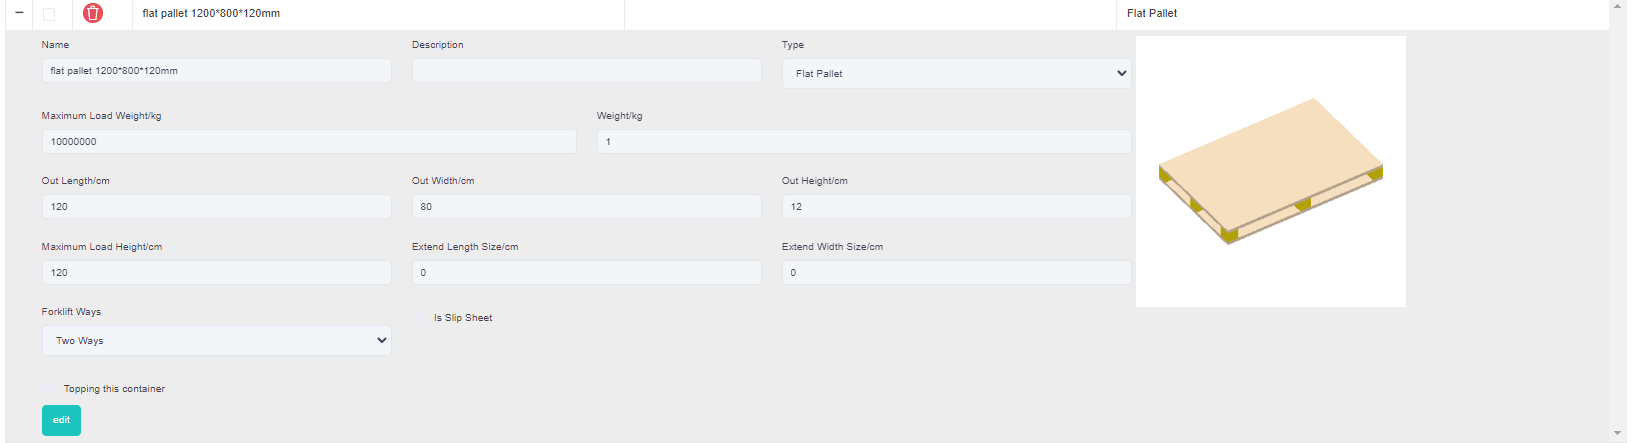
②Then add a pallet, click [Add container], edit the name in the pop-up box (for example, “pallet 1200×800×120”), select the type as “Flat pallet”. And define the length of the pallet as 120cm, width as 80cm and height as 12cm, the maximum loadable height is 120cm, and finally click [Save].
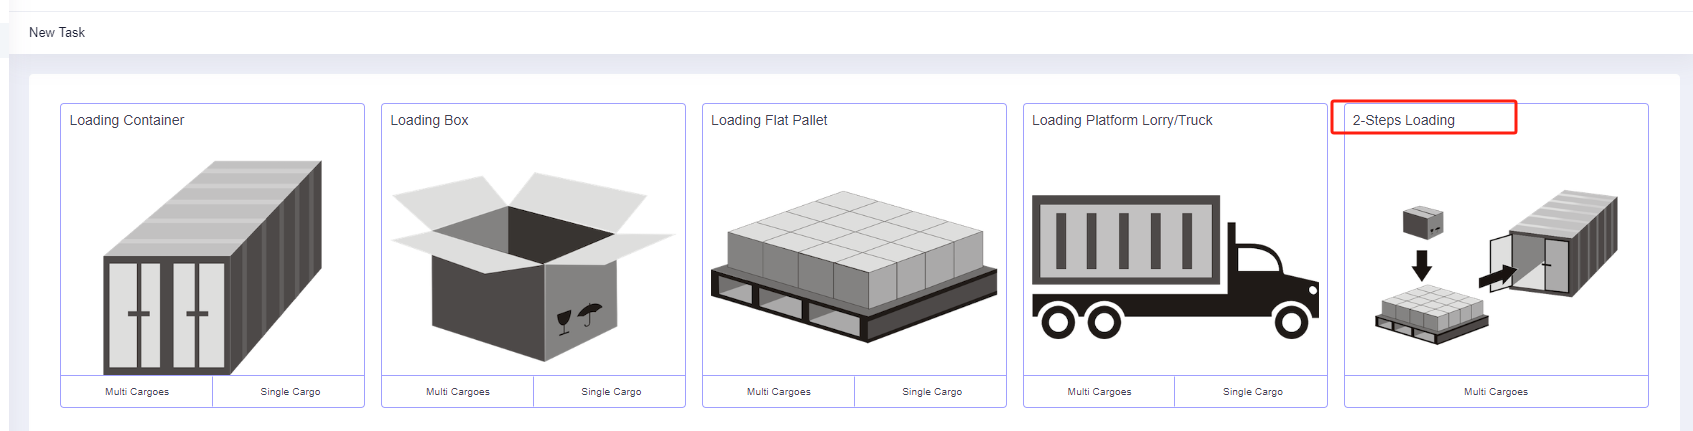
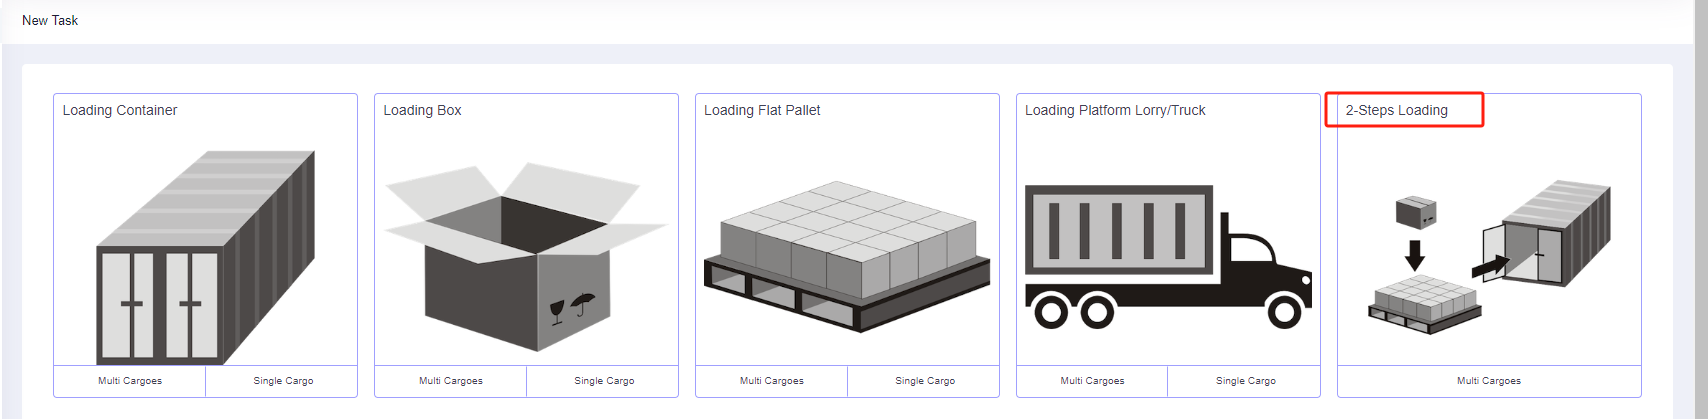
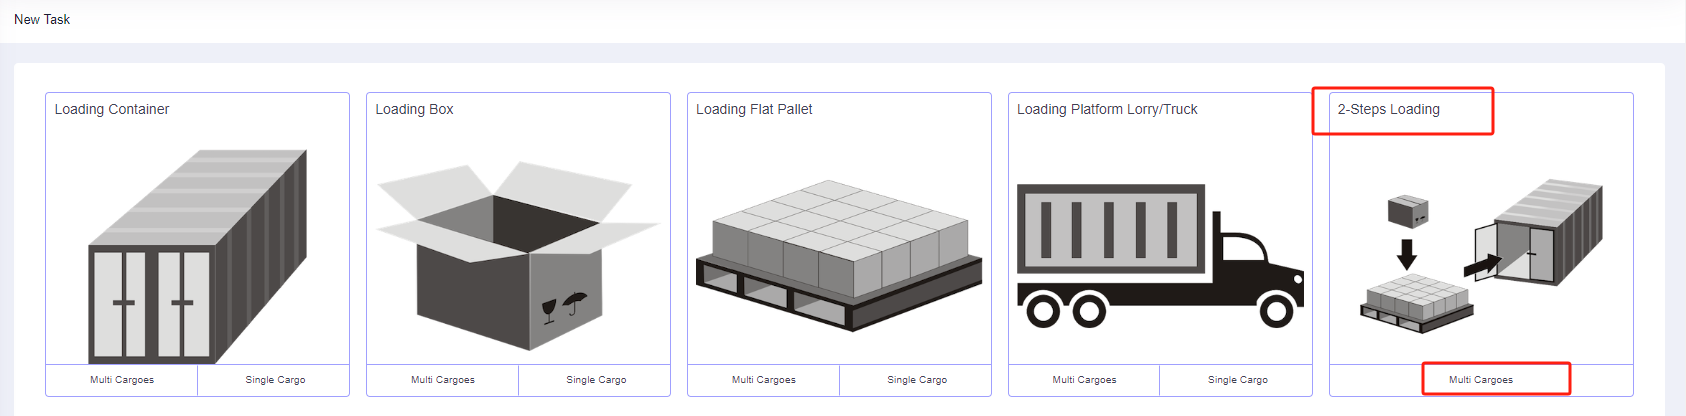
Step 2: According to the current loading requirements, the container loading task type [2-Steps Loading] should be selected.
Enter the [Basic Information] interface and then fill in it with PO number, order number or destination information according to on-site loading requirements for later check.
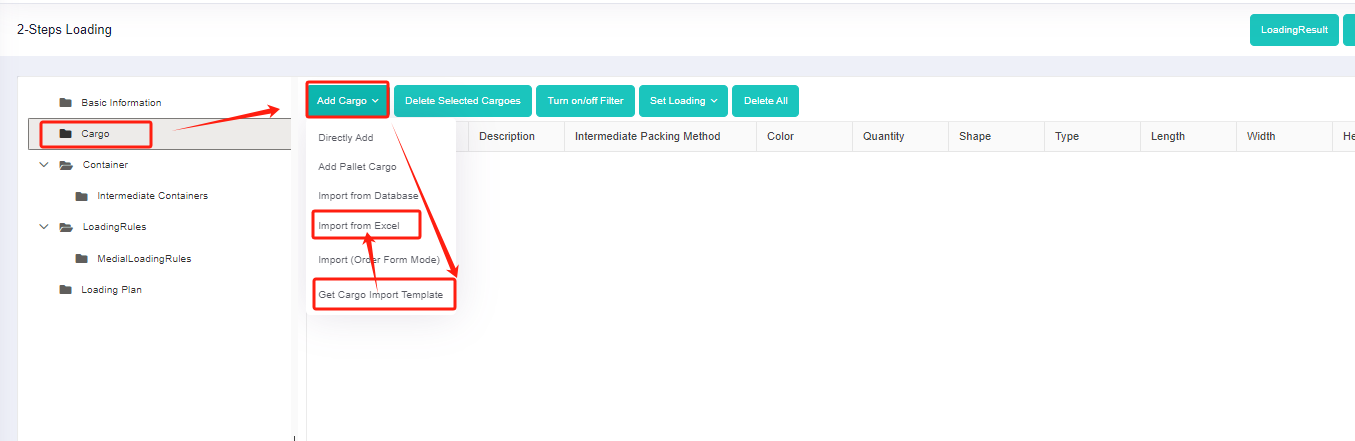
Step 3: Click [Cargo] on the left to enter the cargo interface. For there are various cargo types, you should add them in batches through a container loading optimization excel. Click on [Add Cargo>Import From Excel].
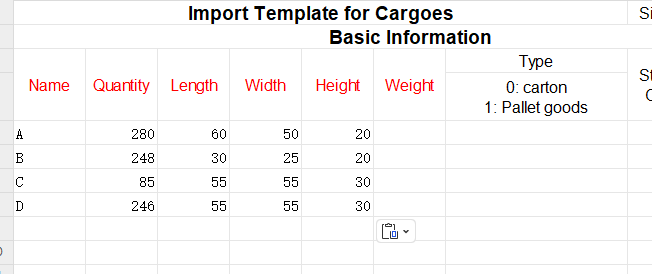
Firstly, click [Add Cargo>Get Excel Template] to download the Excel template and save it to a certain location in your computer.
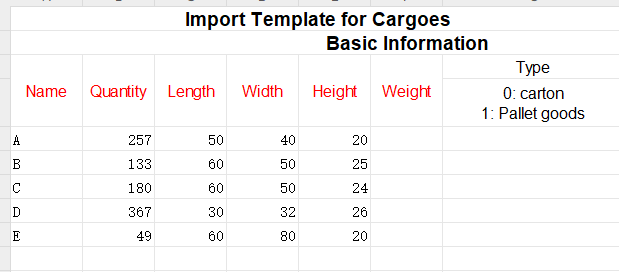
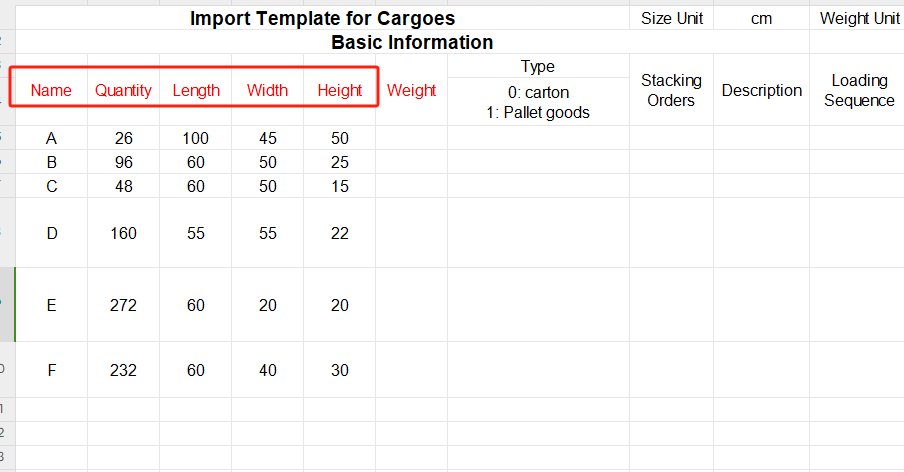
Secondly, fill in the template with the cargo data.
①Copy the name, quantity, length, width, height, and weight (gross weight of a single carton) of the goods into the template, which are required items. Pay attention to the matching of the units.
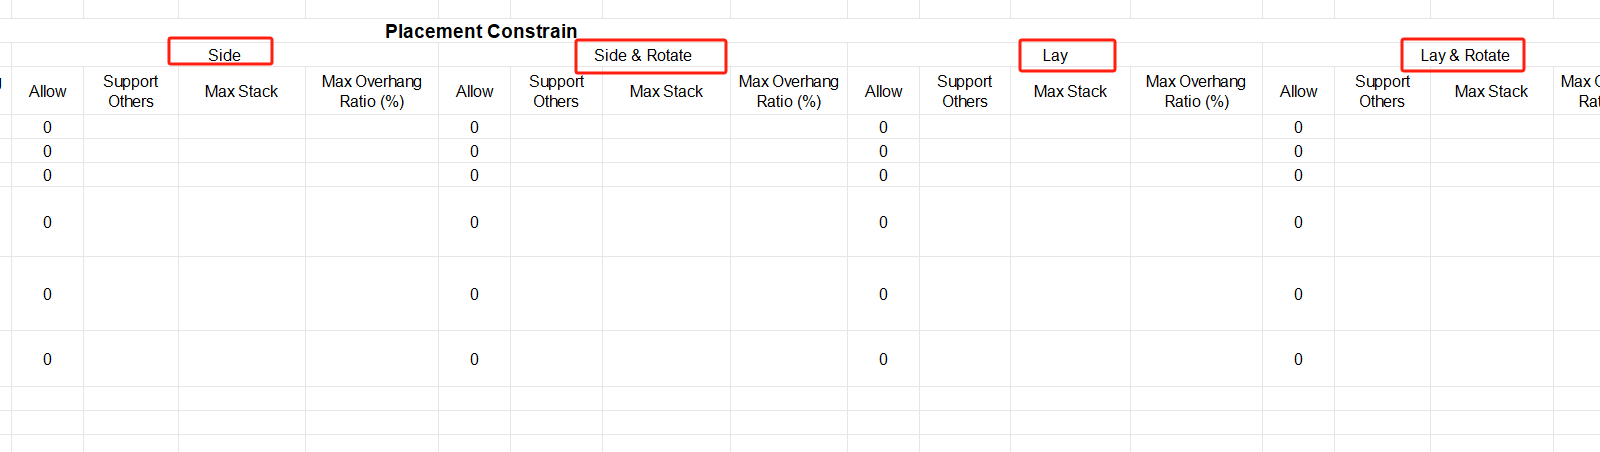
②Then define the load orientations of the goods. For it is required that cargoes can only be placed with the height vertical to the ground, that is only “stand” and “stand & rotate” are allowed, you should fill in “0” under the “allowed” column of other placement methods. “0” means not allowed, leaving it blank or “1” means allowed.
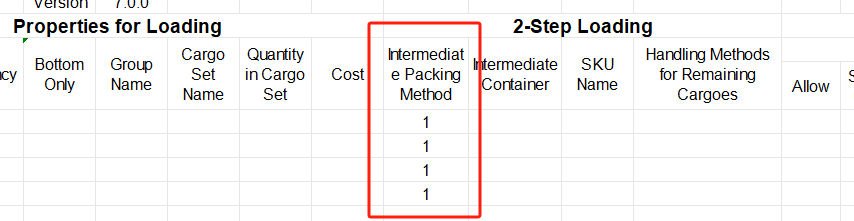
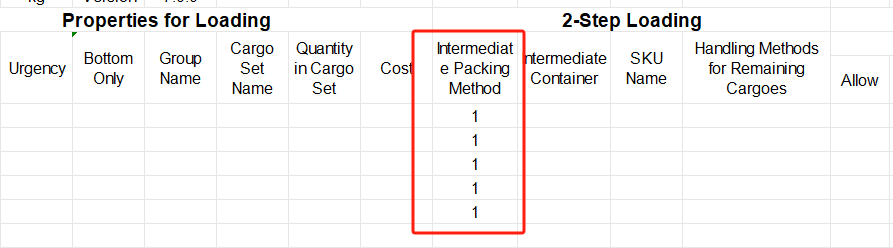
③Define the properties for loading. For cargo A is required to be directly loaded into the container, cargo B and C are first palletized and then loaded into the container, cargo D is packed into a wooden box first and then into the container, cargo E and F are packed into the designated pallet first and then into the container, you should define the “Intermediate Packing Method” respectively as follows : Set A as 0; B C as 1; D E F as 2. And fill in the name of the corresponding designated package, which should be consistent with the name in the container database in the first step.
“0” or leaving it blank means that the goods are directly loaded into the container; “1” means that the software will automatically select the most suitable pallet/carton; “2” means that the goods are loaded on the designated pallet/carton.

In this case, since there are no special loading requirements, then leave them as default.
Thirdly, return to the [Cargo] page, click [Add Cargo>Import From Excel], choose the template in the dialog box, and open it. Then the cargo information will be imported to the software.
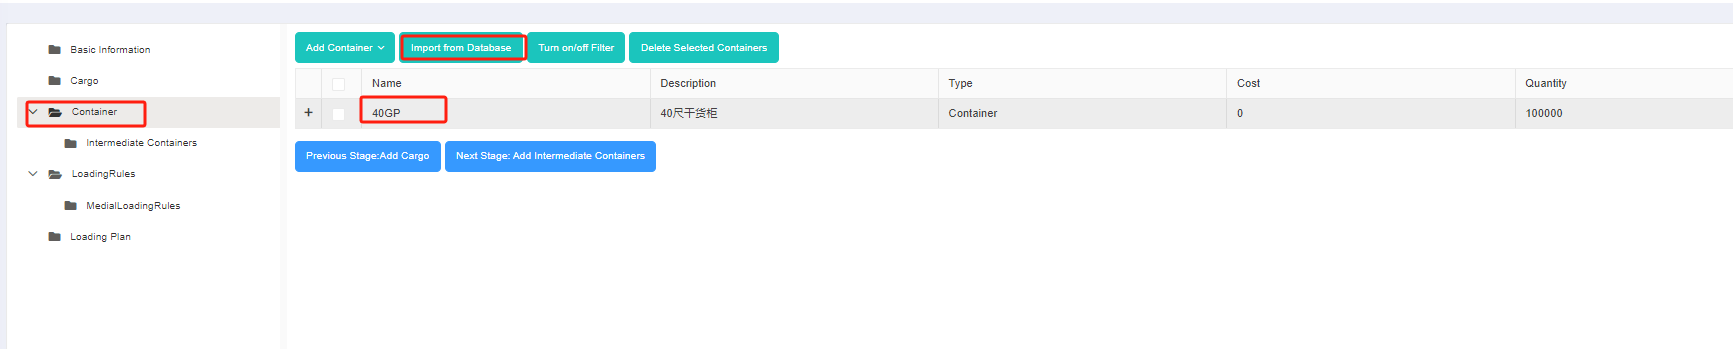
Step 4: Click [Container] on the left to enter the [Container] interface. Add all the frequently used container types so that the system can select the most appropriate container type from these options.
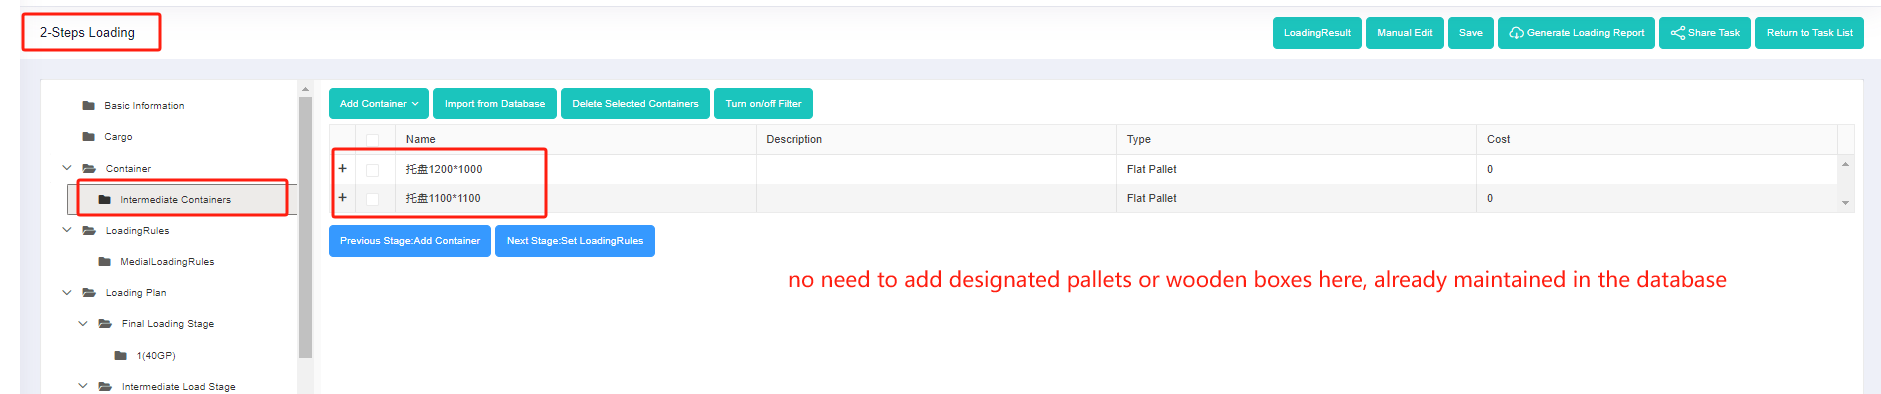
Step 5: Click the [Intermediate Containers] on the left. Then click [Import from Database] to check the commonly used 1200×1000, 1100×1100 pallets in the pop-up box, and then click [add].
If there are no commonly used pallets in the database, you can click the [flat pallet] under [Add Container], and then edit the name, length, width, height and other information. In order to avoid repeated input of container information each time, you can also maintain the commonly used pallets in the database.
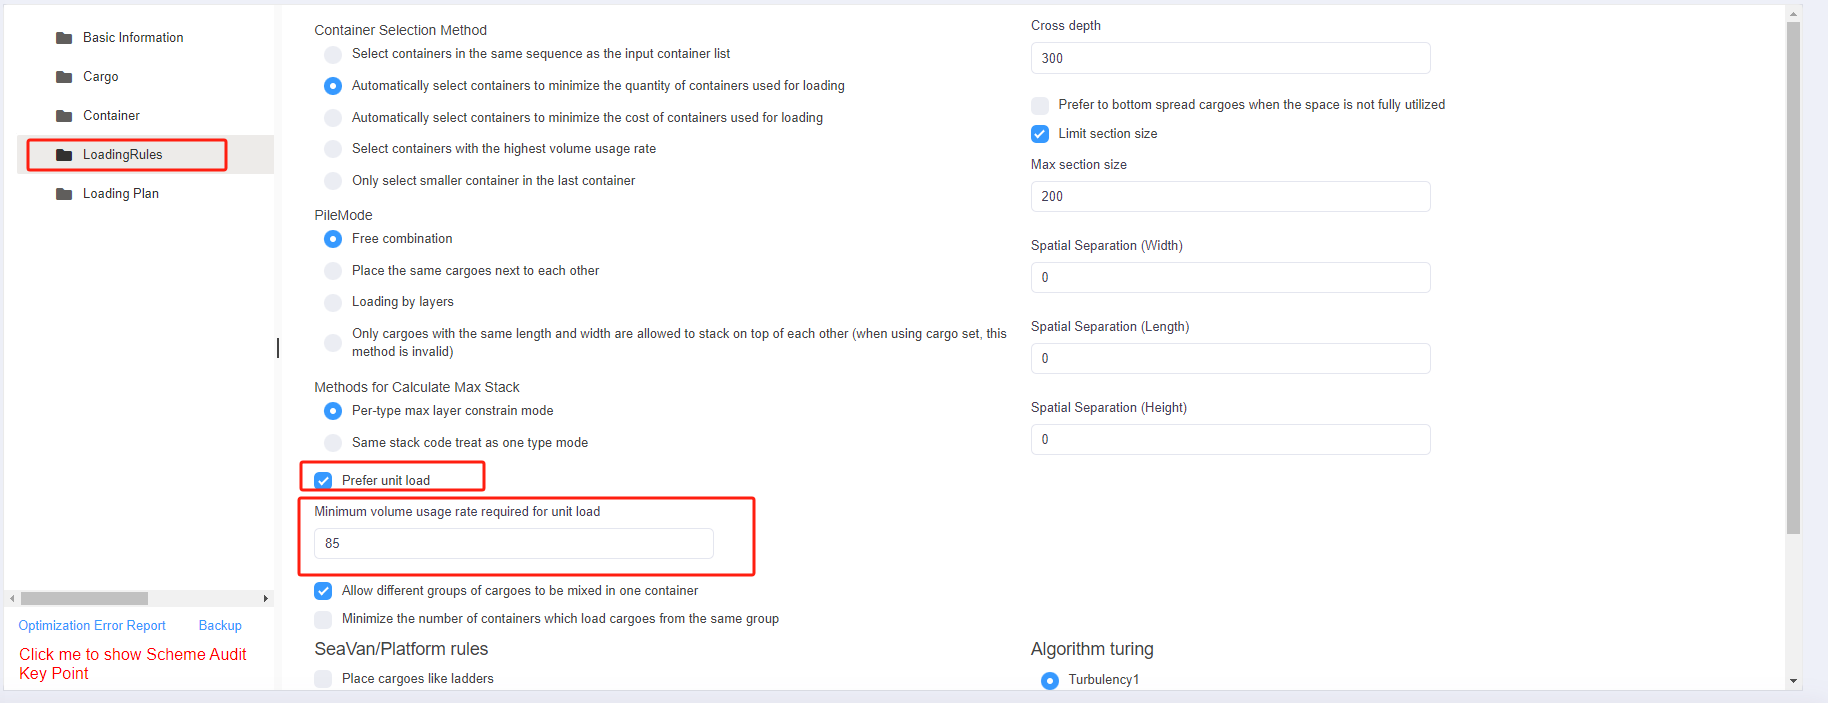
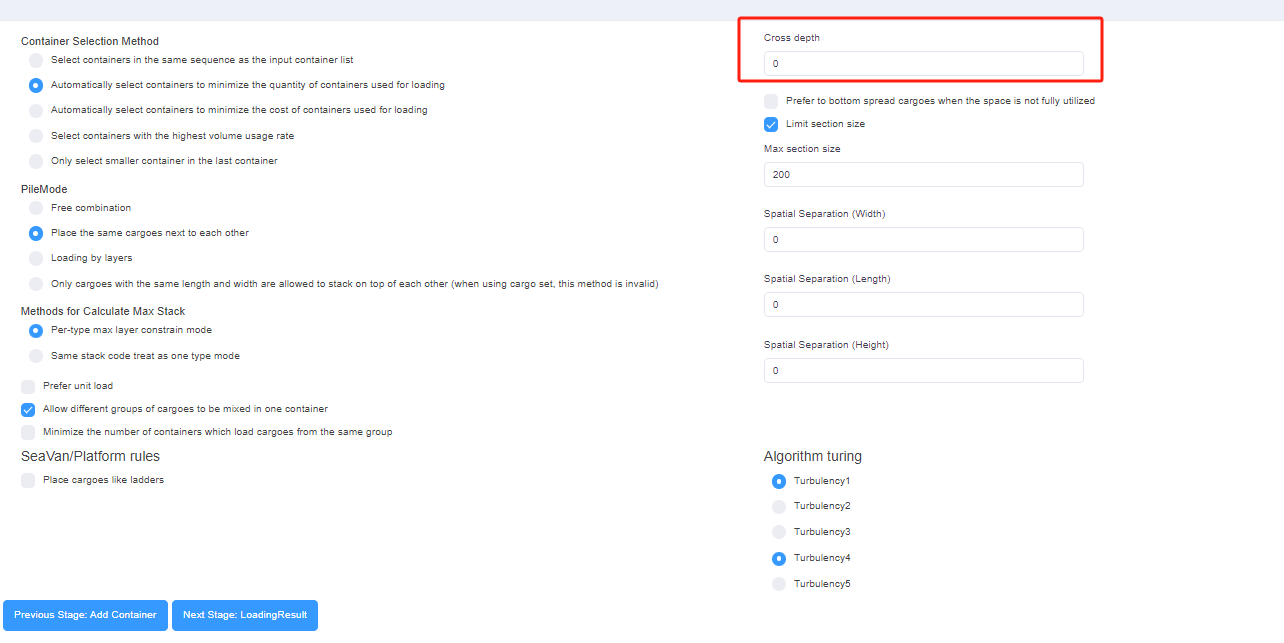
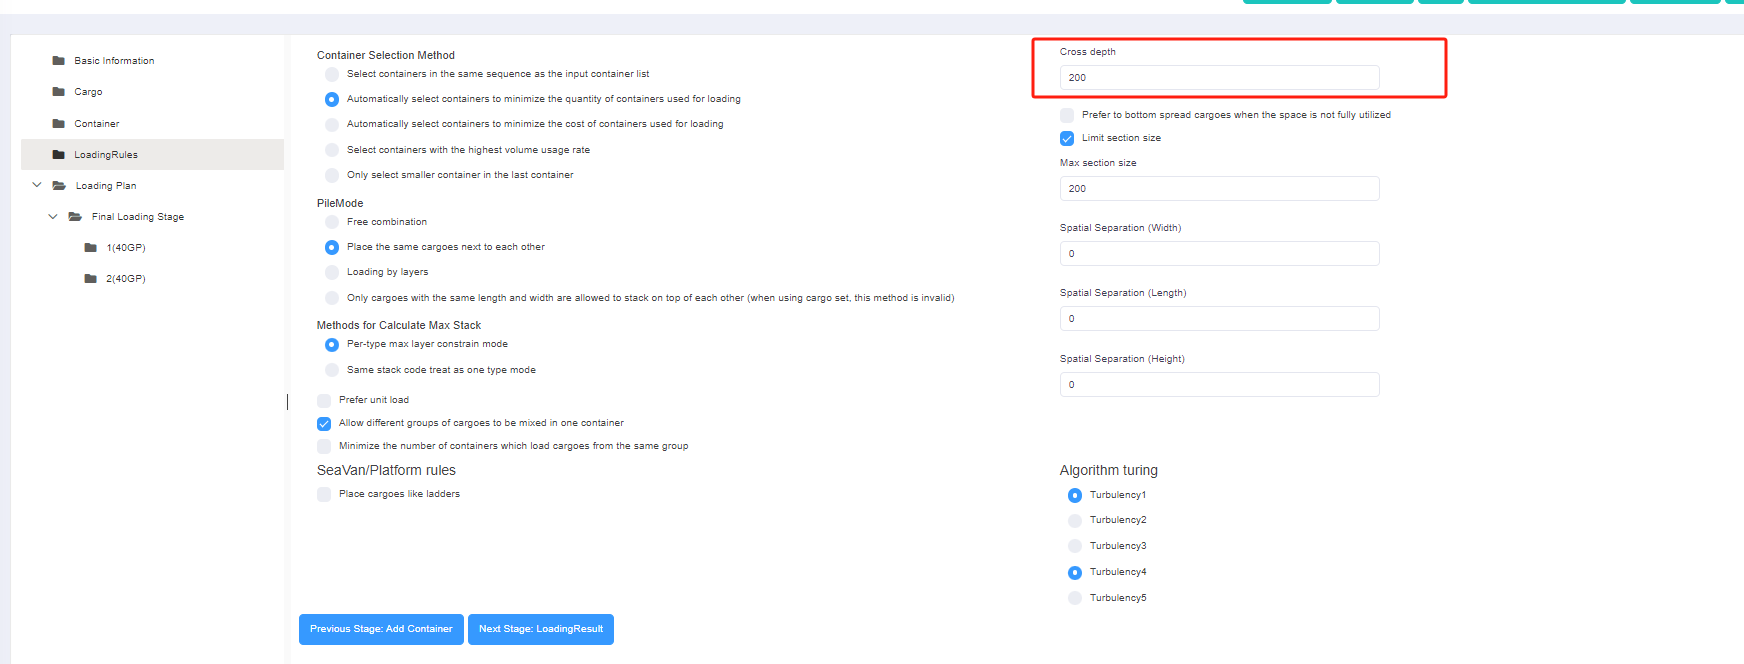
Step 6: Click [Loading Rules] on the left to enter the [Loading Rules] page. For there are no special container and pallet loading requirements, you don’t need to change the default rules in this page.
Step 7: Click [Intermediate Loading Rules] on the left to define the loading rules when the goods are palletized. For there are no special container and pallet loading requirements, you don’t need to change the default rules in this page.
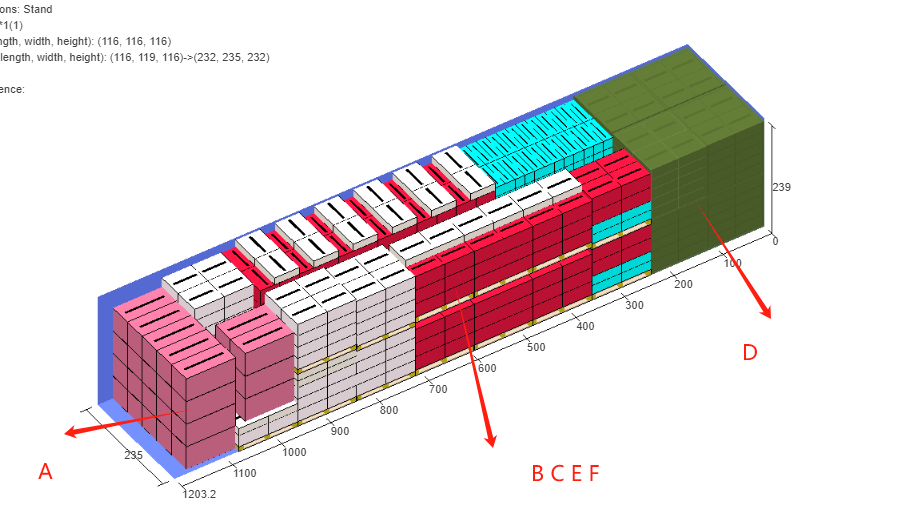
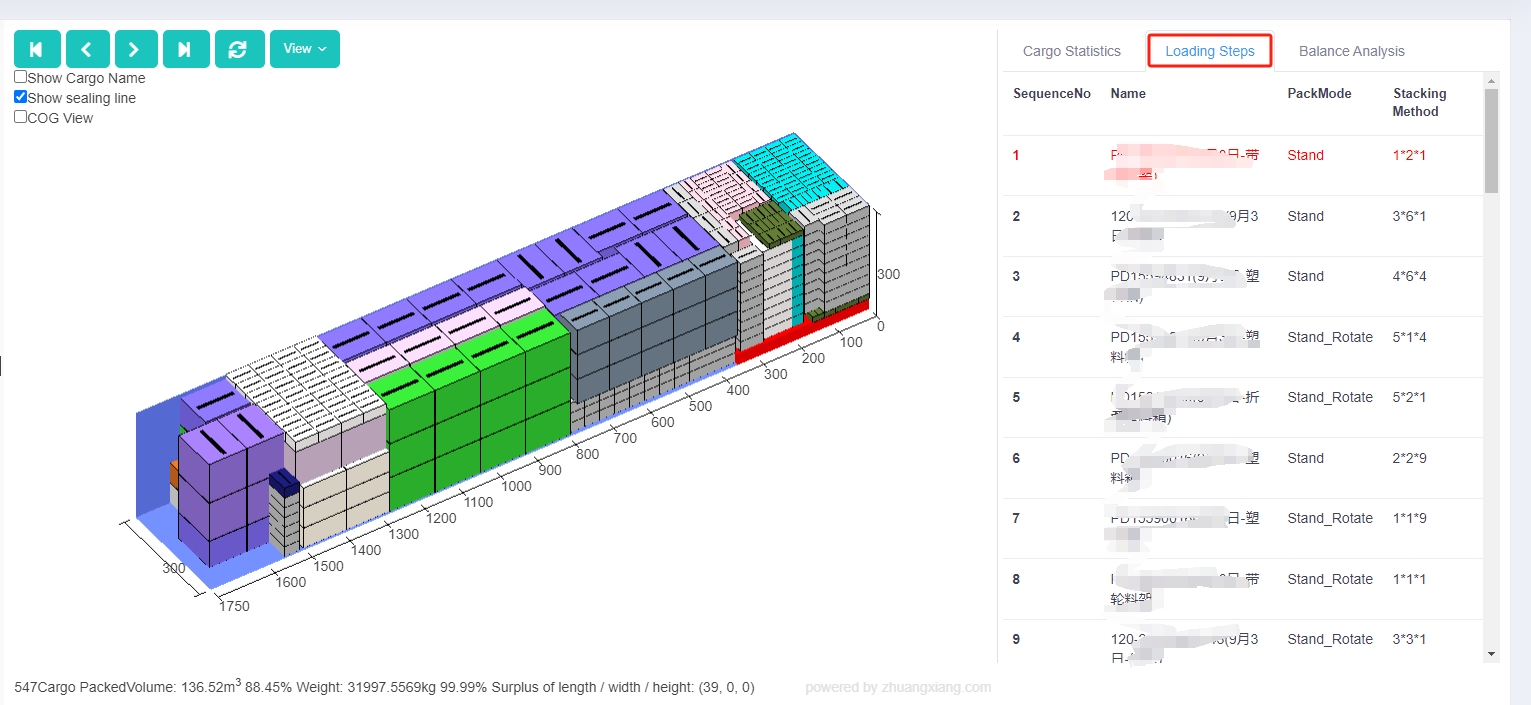
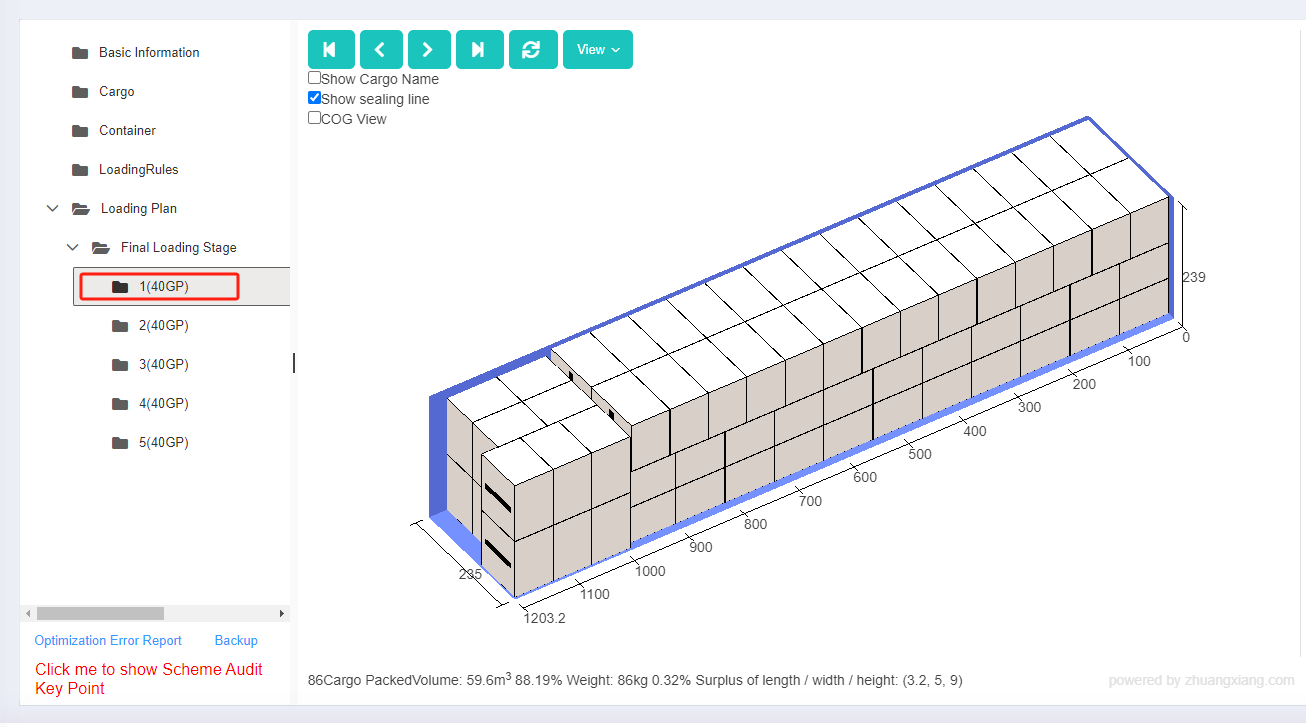
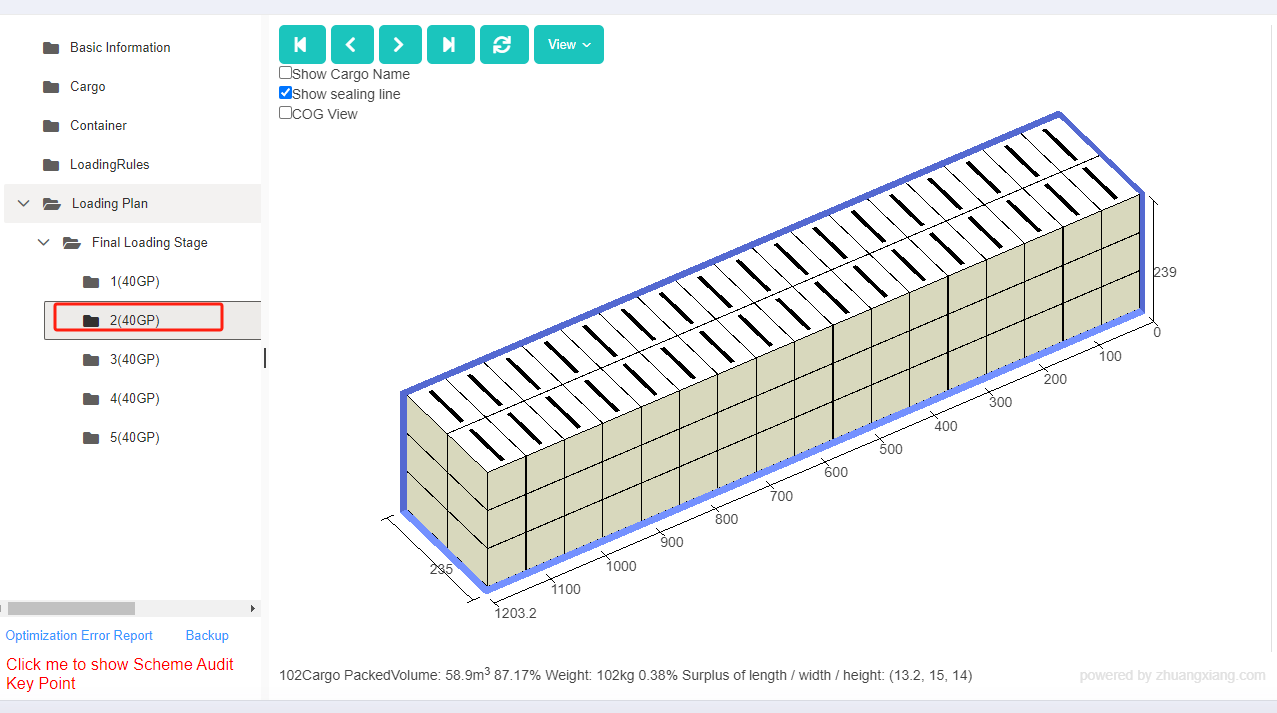
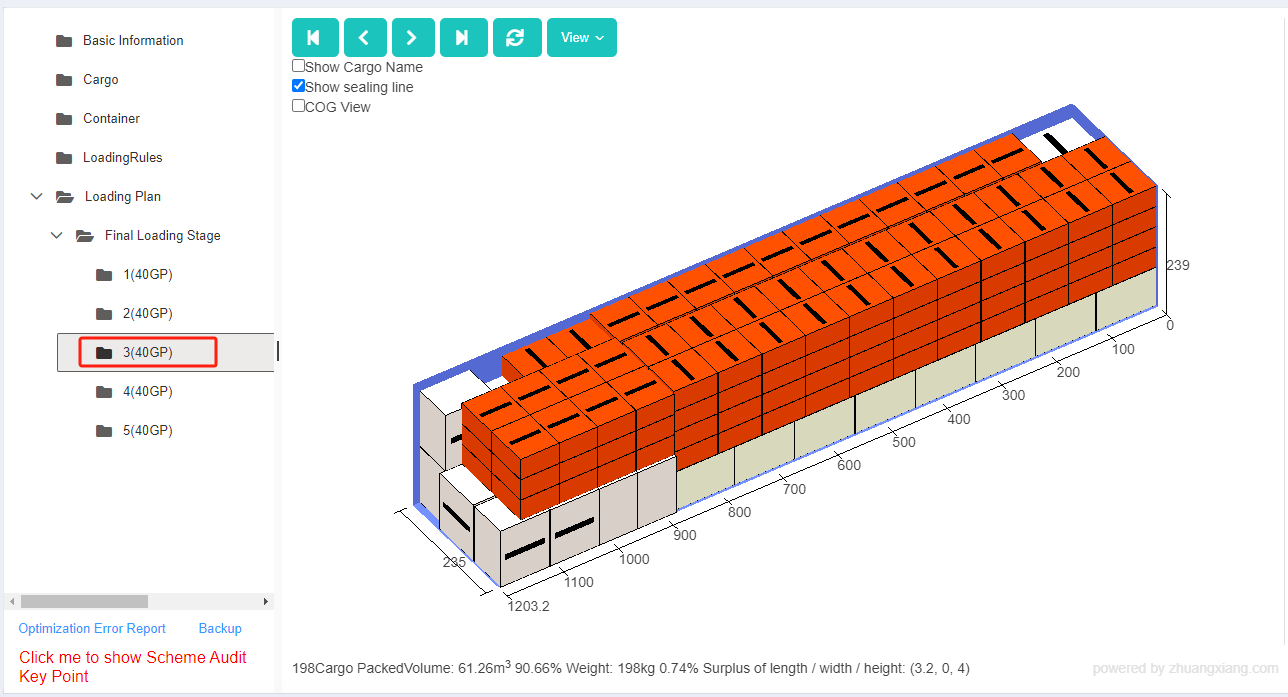
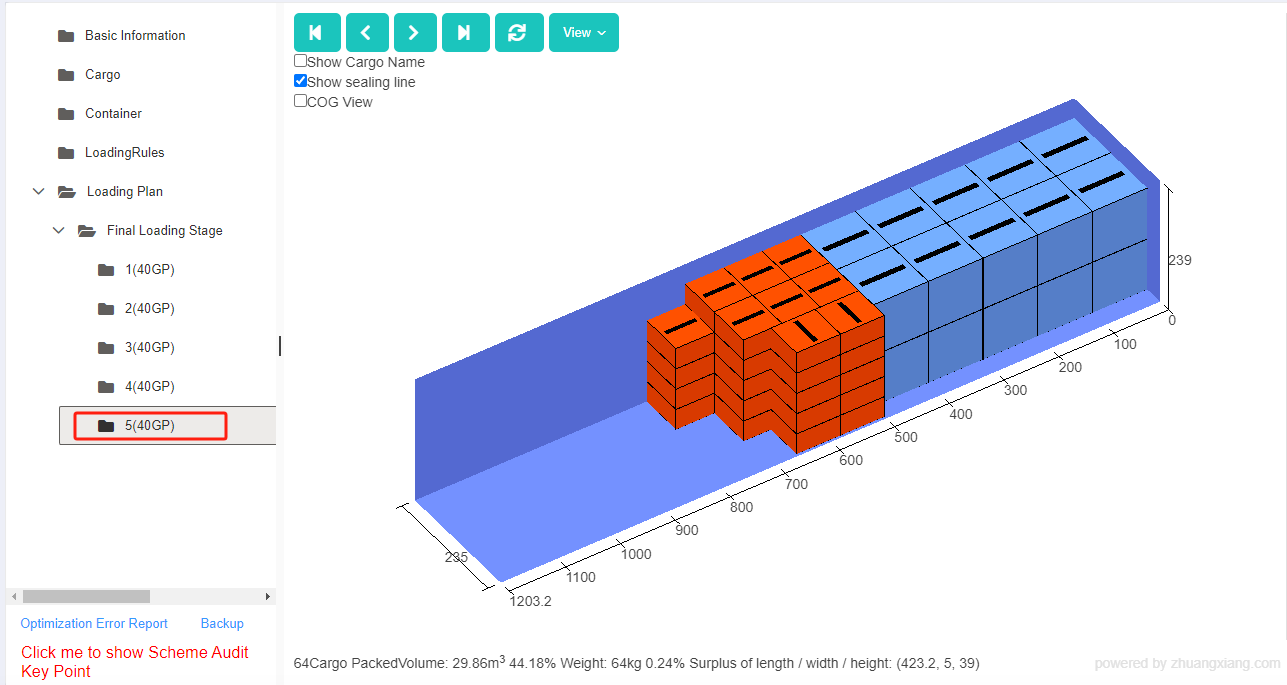
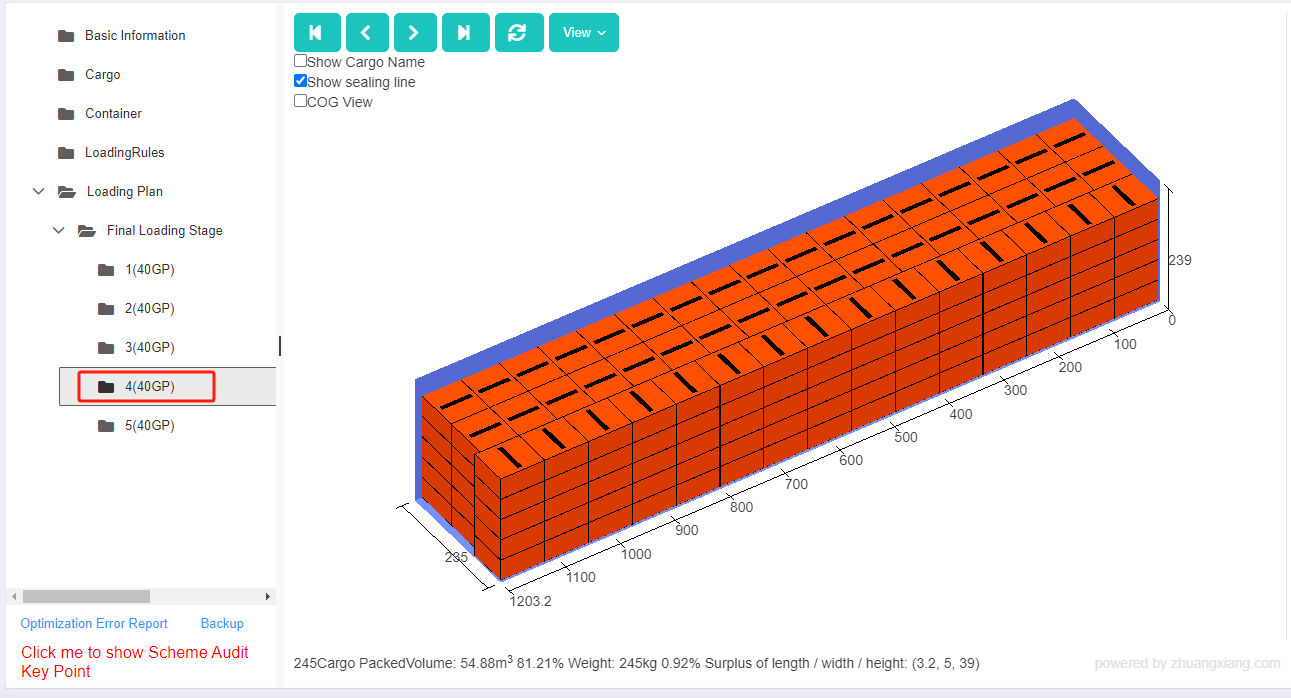
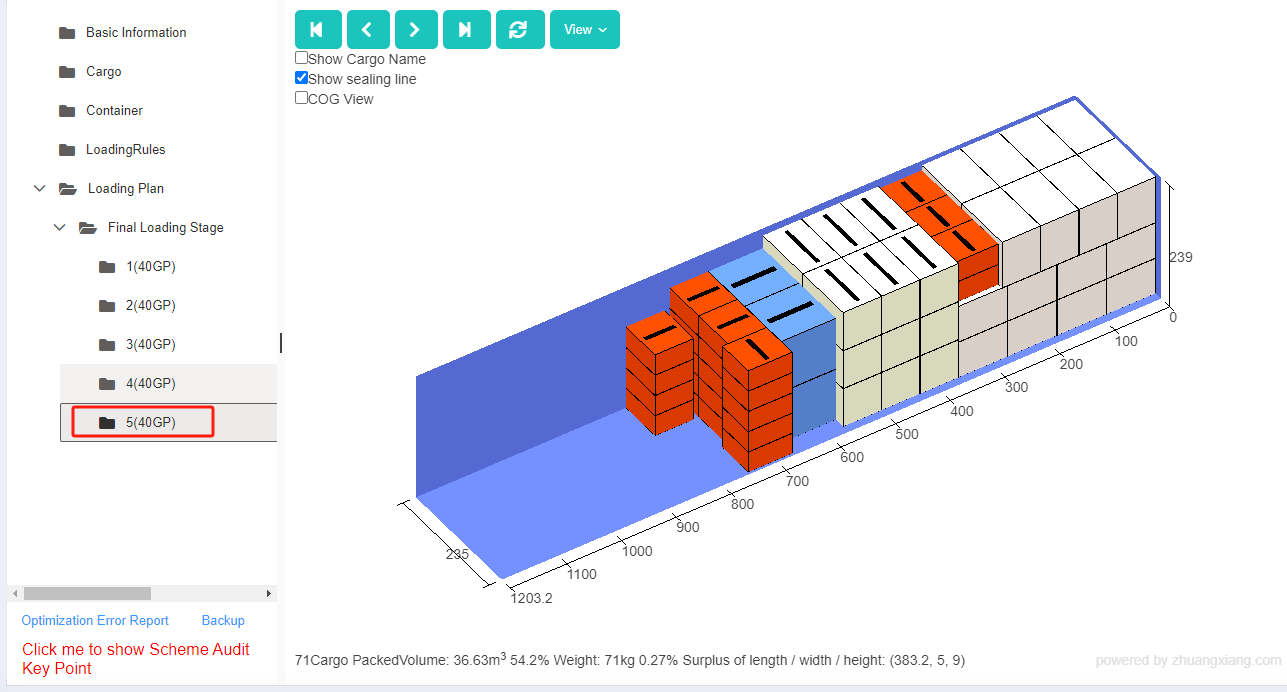
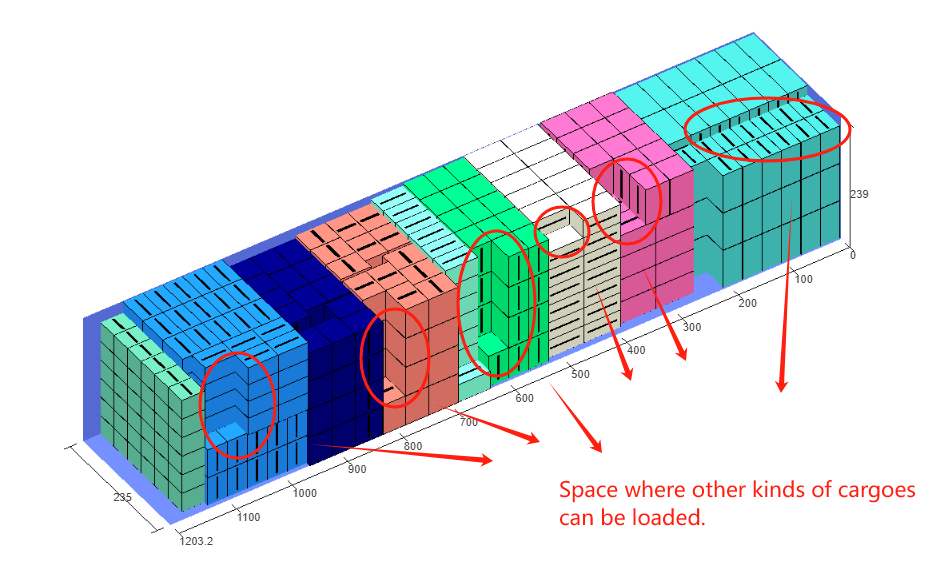
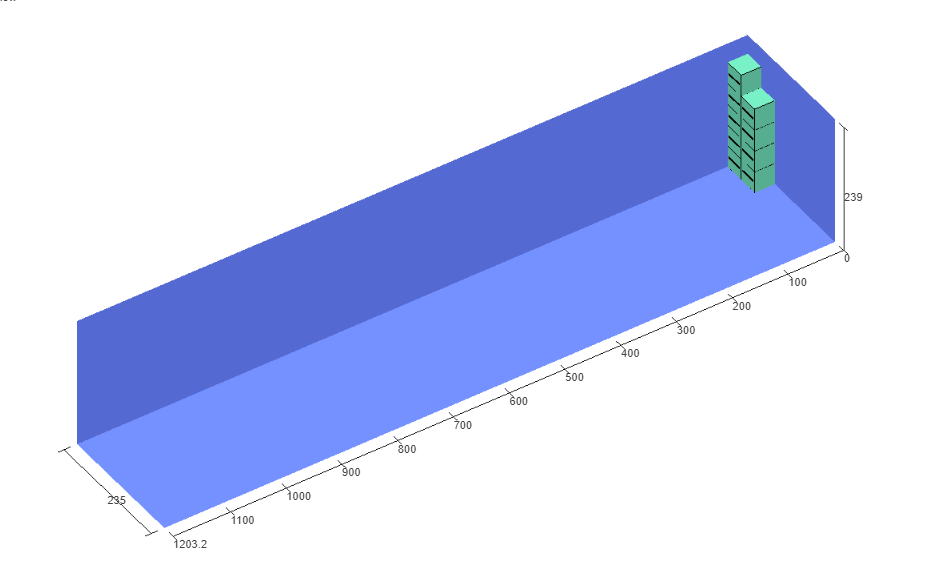
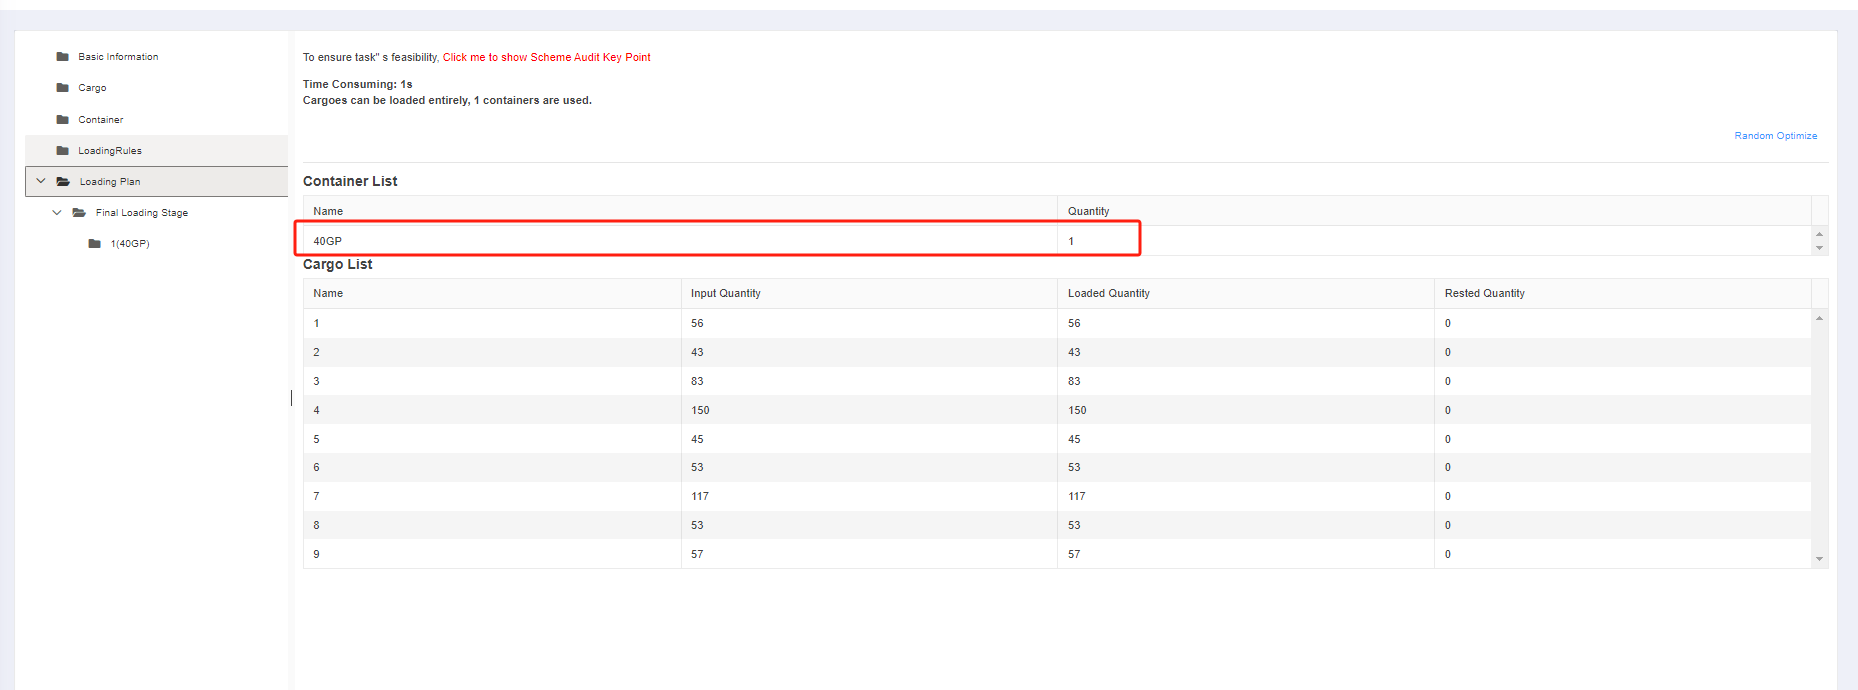
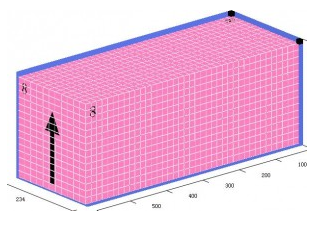
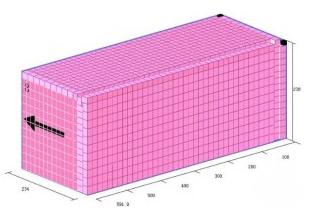
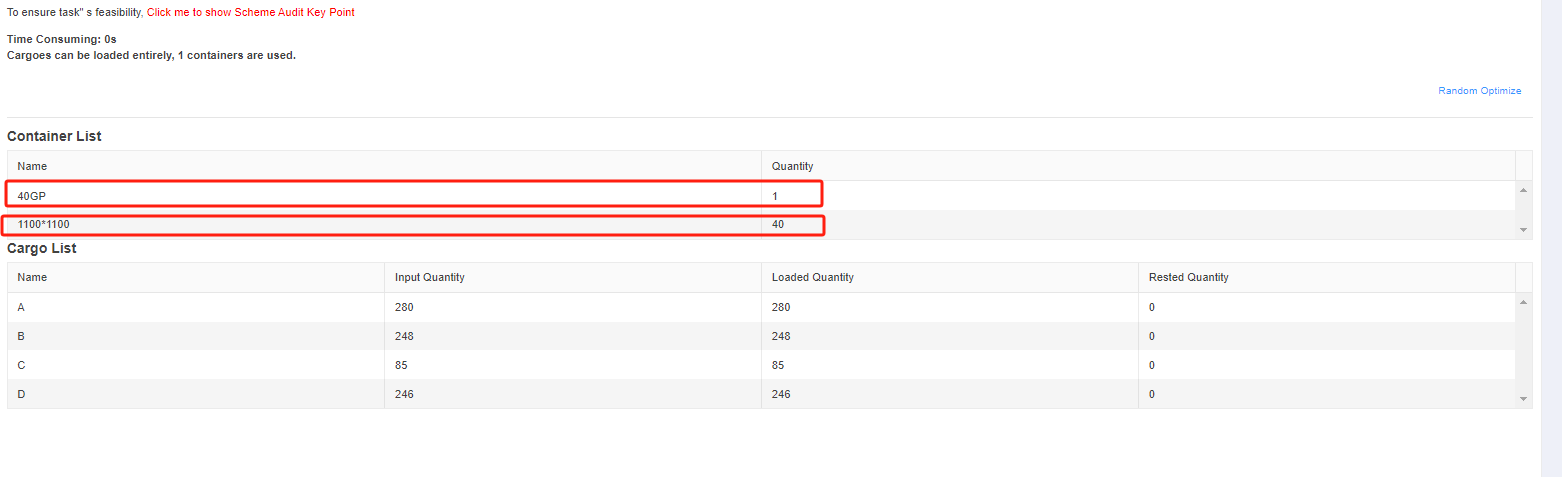
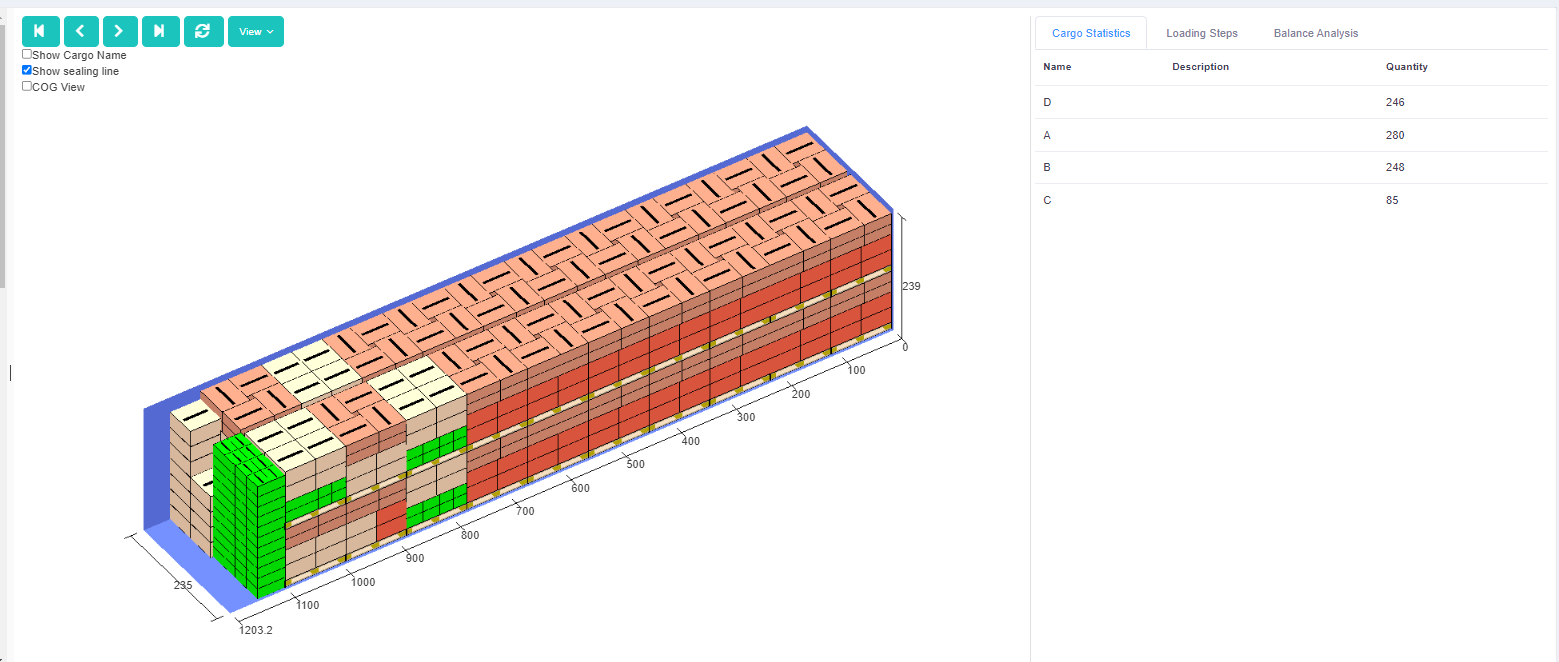
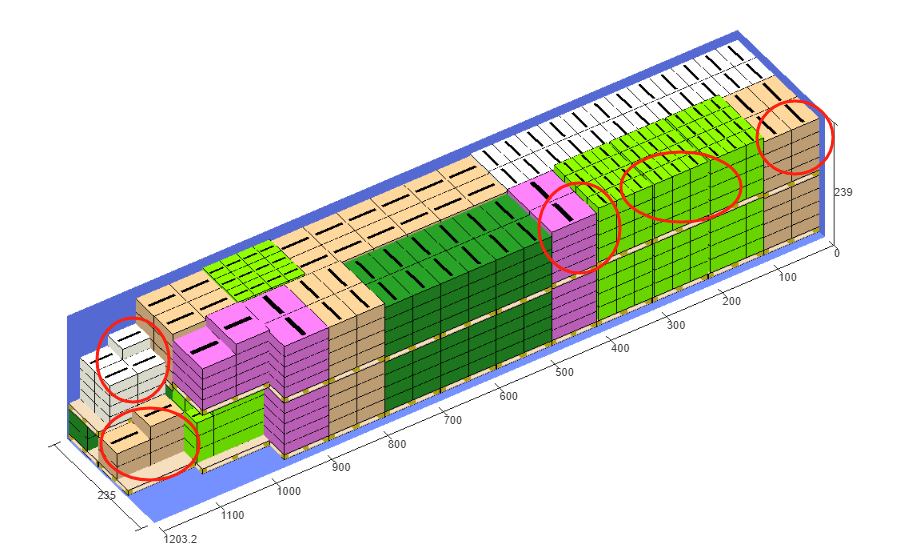
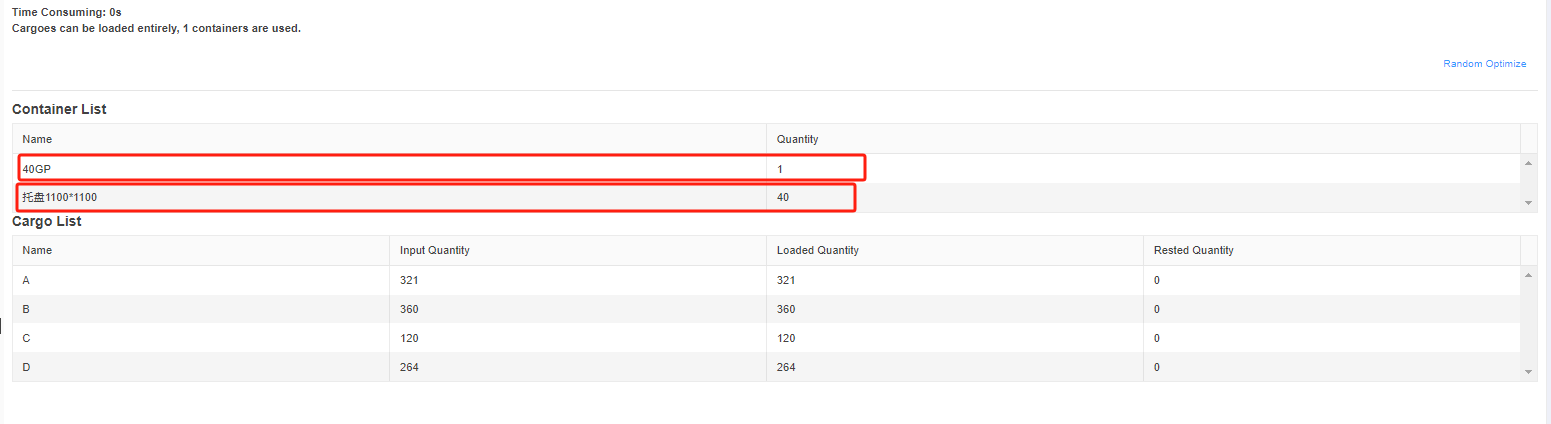
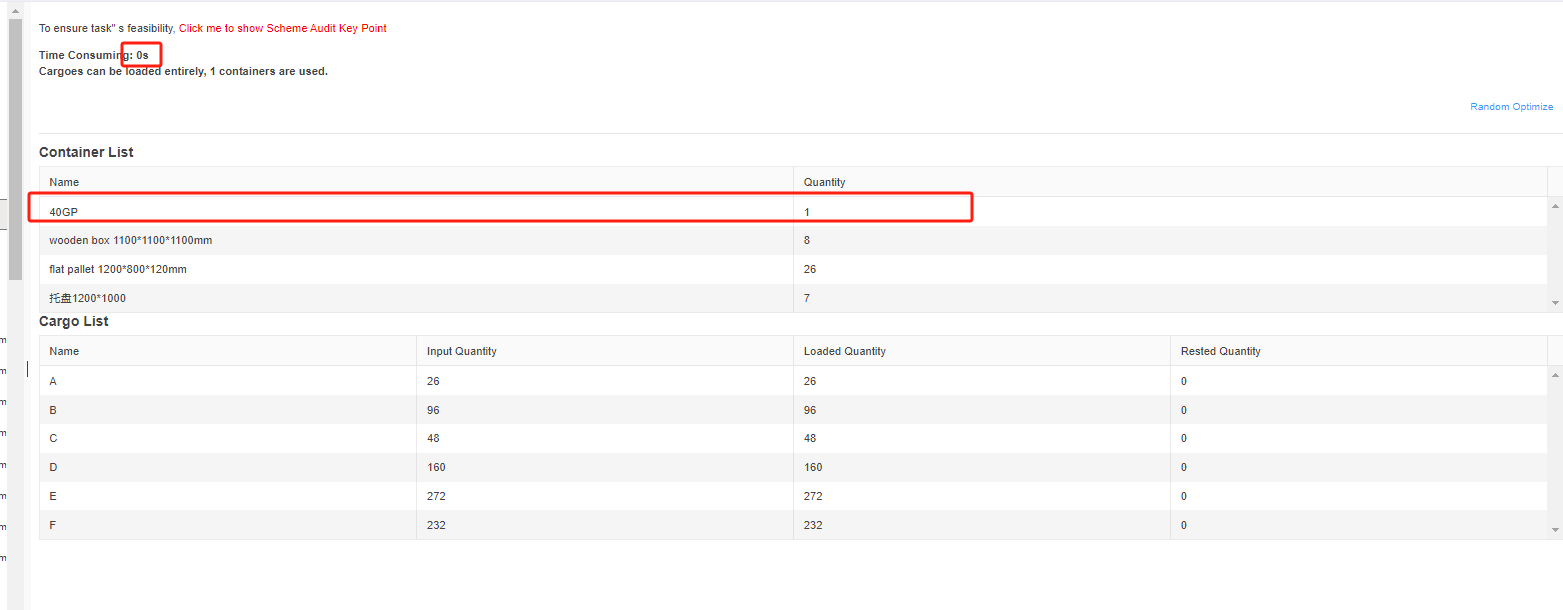
Finally, click [Loading Result] above or click [Loading Plan] on the left to calculate. According to the container list on the left, you can see one 40GP is used. You can click on the container name to see the 3D loading diagram of each pallet or wooden box. On the right side of the diagram are the cargo statistics, loading steps and balance analysis of current container.
Though the 3D container loading diagram you can see that cargo A is directly loaded into the container, cargo D is loaded into the designated wooden box, cargo E and F are loaded on the designated pallet, and cargo B and C are loaded on pallets that the software automatically chooses. All the pallet and container loading requirements are all met.